An email follow-up series is a great way to share a collection of content with subscribers over a period of time.
Some people use email follow-ups to build a relationship with subscribers, while others use the strategy to stay in touch with potential leads as they try to close a sale.
This feature from AWeber is only relevant if you have a bunch of content you're ready to assemble as a follow-up series, or you plan to compile content for this purpose.
Anyhow, have all of your content written in Microsoft Word or whichever program you prefer, so you can have it saved locally to your computer.
Your first step will be to roll your mouse over the “Messages” tab, and then click on “Follow Up”.
Then click on the “Create a New Follow Up Message” button.
The process here is similar to sending an email newsletter in AWeber, as you've got the content ready to go and just have to add information in a couple spots.
Like the email newsletter, the first and most important component is the subject.
This is your headline in the busy inboxes of your readers and you have very little time to convince them they should open it.
Use the option in AWeber to personalize the subject and include a short, descriptive, and interesting subject.
As I suggested previously, keep it to seven words or less, so subscribers can quickly scan and decide whether to open it.
Next up is the email itself. You have the option to send both HTML and text versions of the email.
While AWeber provides a variety of nice templates for HTML emails, I would suggest just going with text emails for now, and then start playing around with HTML newsletters down the road.
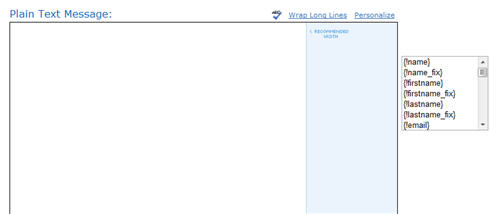
So jump on down to the “Plain Text Message” area and paste in the newsletter you already wrote.
Click the “Wrap Long Lines” link at the top and edit your text, so that it stays within the “Recommended Width” in the white area.
There is an option to attach that file. Don't do it. People don’t like getting attachments they don't expect, and they could delete your email right away with the thought that it has a virus attached.
The first email in the follow-up series is set to send immediately after somebody subscribes and the box is pre-checked to track clicks, so you're good.
Finally, click the “Preview” button. If things look alright, go ahead and click “Save Message”.
Now your email follow-up is ready to test.
Click the “Test” button and send a copy of the email to yourself. Did it get past your spam filter? Does it look good?
OK, so now you just click “Create a New Follow Up Message” and repeat the process for your second in the email follow-up series.
The only difference is to choose the interval that this second message will go out.
The default is for it to go four days after the first email. Stick with that for now, and you can tweak later to test different patterns of days.
There was also the option to only deliver this message on certain days and times. AWeber leaves this unchecked by default, and I'd suggest you do the same until you have more time to test the days that seem to have more impact for your subscribers.
You'll just repeat this same process for each additional follow-up email you want to add into the system.


are you going to finish these chapters? just asking cause its interesting.
thanks
Hey Craig –
I am writing them as often as I can – this one was published just 3 days ago.
Great Work Shawn. But You should update your article regularly